Learning how to change a tire on Kia Picanto is a very important skill to have in so you don’t end up stranded by the side of a remote road.
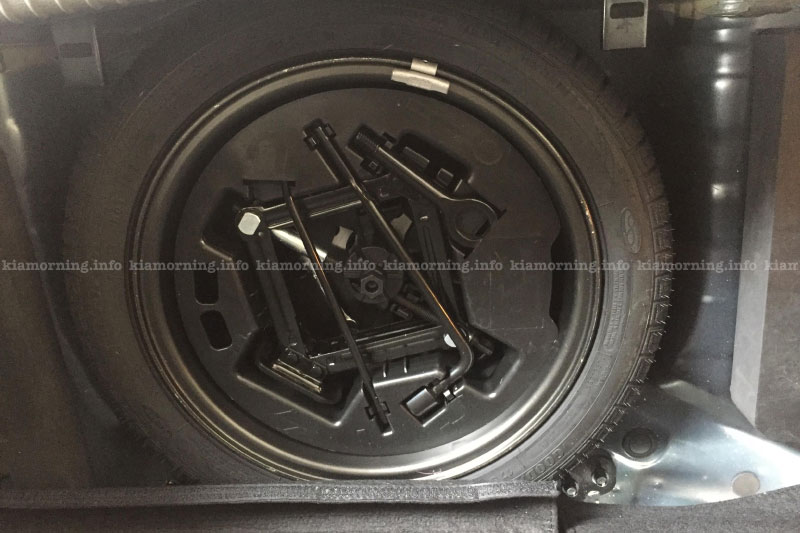
Jack and tools
The jack, jack handle, wheel lug nut wrench are stored in the luggage compartment. Pull up the luggage box cover to reach this equipment.
- Jack handle
- Jack
- Wheel lug nut wrench
Warning:
- The vehicle can roll off the jack causing serious injury or death. Do not get under a vehicle that is supported by a jack.
- Do not start or run the engine while the vehicle is on the jack.
- Do not allow anyone remain in the vehicle while it is on the jack.
Removing and storing the spare tyre
Turn the tyre hold-down wing bolt counterclockwise. Store the tyre in the reverse order of removal. To prevent the spare tyre and tools from “rattling” whilst the vehicle is in motion, store them properly.
Changing tyres
- Park on a level surface and apply the parking brake firmly.
- Shift the shift lever into R (Reverse) with manual transaxle or P (Park) with automatic transaxle.
- Activate the hazard warning flasher.
- Remove the wheel lug nut wrench, jack, jack handle, and spare tyre from the vehicle.
- Block both the front and rear of wheel that is diagonally opposite the jack position.
- Loosen the wheel lug nuts counterclockwise one turn each, but do not remove any nut until the tyre has been raised off the ground.
- Place the jack at the front(1) or rear(2) jacking position closest to the tyre you are changing. Place the jack at the designated locations under the frame. The jacking positions are plates welded to the frame with two tabs and a raised dot to index with the jack.
- Insert the jack handle into the jack and turn it clockwise, raising the vehicle until the tyre just clears the ground. This measurement is approximately 30 mm (1.2 in). Before removing the wheel lug nuts, make sure the vehicle is stable and that there is no chance for movement or slippage.
- Loosen the wheel nuts and remove them with your fingers. Slide the wheel off the studs and lay it flat so it cannot roll away. To put the wheel on the hub, pick up the spare tyre, line up the holes with the studs and slide the wheel onto them.
If this is difficult, tip the wheel slightly and get the top hole in the wheel lined up with the top stud. Then jiggle the wheel back and forth until the wheel can be slid over the other studs. - To reinstall the wheel, hold it on the studs, put the wheel nuts on the studs and tighten them finger tight. Jiggle the tyre to be sure it is completely seated, then tighten the nuts as much as possible with your fingers again.
- Lower the vehicle to the ground by turning the wheel nut wrench counterclockwise.
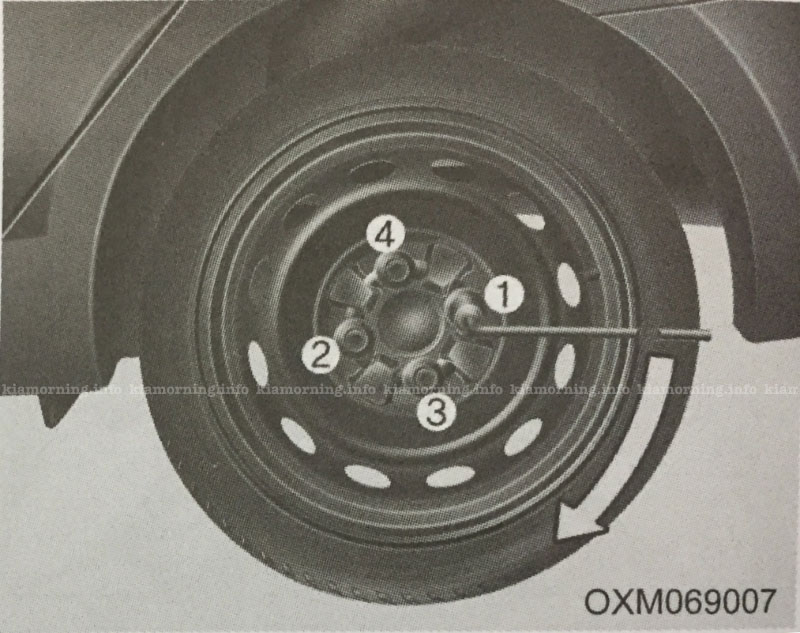
Then position the wrench as shown in the drawing and tighten the wheel nuts. Be sure the socket is seated completely over the nut. Do not stand on the wrench handle or use an extension pipe over the wrench handle. Go around the wheel tightening every other nut until they are all tight. Then double-check each nut for tightness. After changing wheels, have the system checked by a professional workshop. Kia recom- mends to visit an authorised Kia dealer/service partner.
Wheel nut tightening torque:
Steel wheel & aluminum alloy wheel: 11~13kgf·m (79~94lbf·ft)
Notice:
- Undernocircumstancesshouldyou exceed 80 km/h (50 mph); a higher speed could damage the tyre.
- Ensure that you drive slowly enough to avoid all hazards. Any road hazard, such as a pothole or debris, could seriously damage the compact spare.
- Any continuous road use of this tyre could result in tyre failure, loss of vehicle control, and possible personal injury.
- Do not exceed the vehicle’s maximum load rating or the load-carrying capacity shown on the sidewall of the compact spare tyre.
- Avoid driving over obstacles. The compact spare tyre diameter is smaller than the diameter of a conventional tyre and reduces the ground clearance approximately 2.5 cm (1 inch), which could result in damage to the vehicle.
- Do not take the vehicle through an automatic car wash whilst the compact spare tyre is installed.
- Do not use tyre chains on the temporary compact tyre. Because of the smaller size, a tyre chain will not fit properly. This could damage the vehicle and result in loss of the chain.
- Temporary compact tyre should not be installed on the front axle if the vehicle must be driven in snow or on ice.
- Do not use the temporary compact tyre on any other vehicle because this tyre has been designed especially for your Picanto.
- The temporary compact tyre tread life is shorter than a regular tyre. Inspect your temporary compact tyre regularly and replace worn compact spare tyres with the same size and design, mounted on the same wheel.
- The temporary compact tyre should not be used on any other wheels, nor should standard tyres, snow tyres, wheel covers or trim rings be used with the temporary compact spare wheel. If such use is attempted, damage to these items or other car components may occur.
- Do not use more than one temporary compact tyre at a time.
- Do not tow a trailer whilst the temporary compact tyre is installed.